Create a new C# Minimal API project (use at least dotnet 8) and use this Program.cs file:
using Microsoft.AspNetCore.Mvc;

// Setup
var builder = WebApplication.CreateBuilder(args);

builder.Services.AddEndpointsApiExplorer();
builder.Services.AddSwaggerGen();

var app = builder.Build();

app.UseSwagger();
app.UseSwaggerUI();

// Endpoint mapping
app.MapPost("/add", SaveFile);

app.MapGet("get/{name}", GetFileContent);

// Endpoint implementation
async Task<IResult> GetFileContent([FromRoute] string name)
{
    var fileNames = FileNames.FromInput(name);
    if (!File.Exists(fileNames.PersistentFilePath))
    {
        return Results.NotFound();
    }

    var content = await File.ReadAllTextAsync(fileNames.PersistentFilePath);
    return Results.Ok(content);
}

async Task SaveFile([FromBody] AddRequest addRequest)
{
    var fileNames = FileNames.FromInput(addRequest.Name);
    await using (var sw = File.CreateText(fileNames.TempFilePath))
    {
        await sw.WriteAsync(addRequest.Content);
    }

    if (File.Exists(fileNames.TempFilePath))
    {
        File.Move(
            fileNames.TempFilePath,
            fileNames.PersistentFilePath,
            overwrite: true);
    }
}

if (!Directory.Exists("./temp"))
{
    Directory.CreateDirectory("./temp");
}

if (!Directory.Exists("./persistent"))
{
    Directory.CreateDirectory("./persistent");
}

app.Run();

public class FileNames
{
    public string FileName { get; set; }

    public string TempFilePath
    {
        get => "./temp/" + FileName;
    }

    public string PersistentFilePath
    {
        get => "./persistent/" + FileName;
    }

    public static FileNames FromInput(string name) =>
        new()
        {
            FileName = SanitizeFileName(name) + ".txt"
        };

    private static string SanitizeFileName(string name)
    {
        string invalidChars = System.Text.RegularExpressions.Regex.Escape( new string( Path.GetInvalidFileNameChars() ) );
        string invalidRegStr = string.Format( @"([{0}]*\.+$)|([{0}]+)", invalidChars );

        return System.Text.RegularExpressions.Regex.Replace( name, invalidRegStr, "_" );
    }
}

public class AddRequest
{
    public string Name { get; set; }
    public string Content { get; set; }
}
In this exercise you will have to perform a lot of steps without any explanation. Your goal is to find your own conclusions on how data is stored inside and outside containers and how volumes work. It is highly recommended that you document your findings after each step.
# Instructions
- Dockerize this application using a
Dockerfile. You will need these commands:-
can also be done in Rider when creating a new project + add .dockerfile
-
dotnet restore <path to .csproj file> -
dotnet build <path to .csproj file> -c Release -o <output path> -
dotnet publish <path to .csproj file> -c Release -o <output path> /p:UseAppHost=false
-
- Create an image using the tag
volumes-exercise
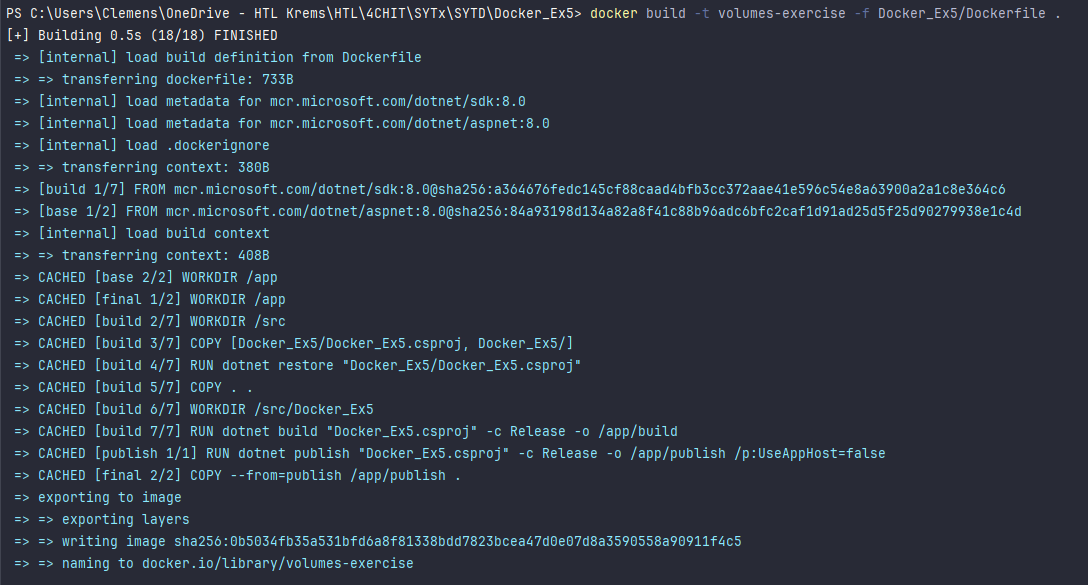
# find dockerfile in the solution
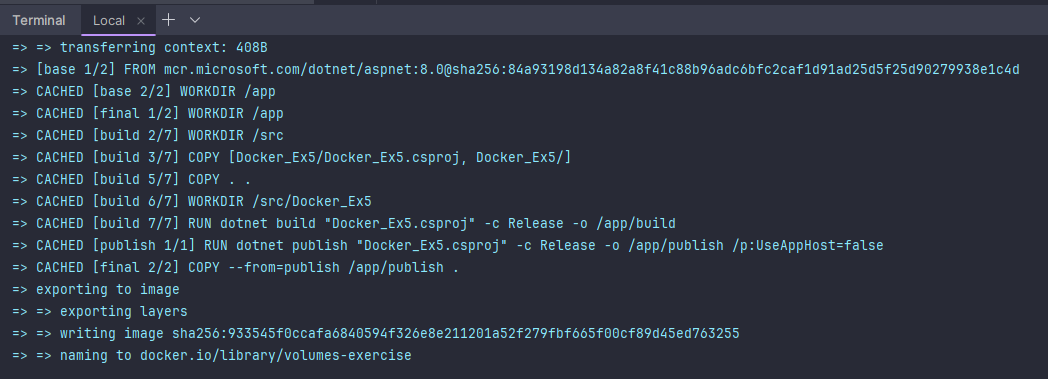
docker build -t volumes-exercise -f Docker_Ex5/Dockerfile .In my case it gets cached, because I built it a second time for a screenshot.
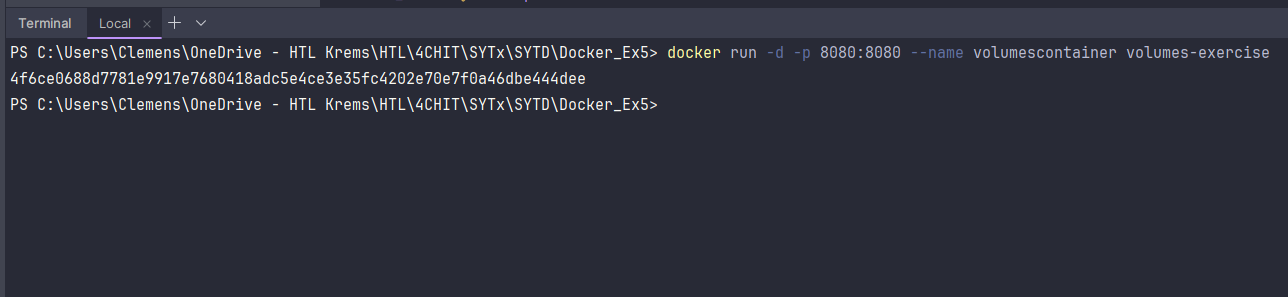
- Start a container using this image using
docker run -d -p 8080:8080 --name volumescontainer volumes-exercise
Now the container is running on port 8080 and forwards also to port 8080.

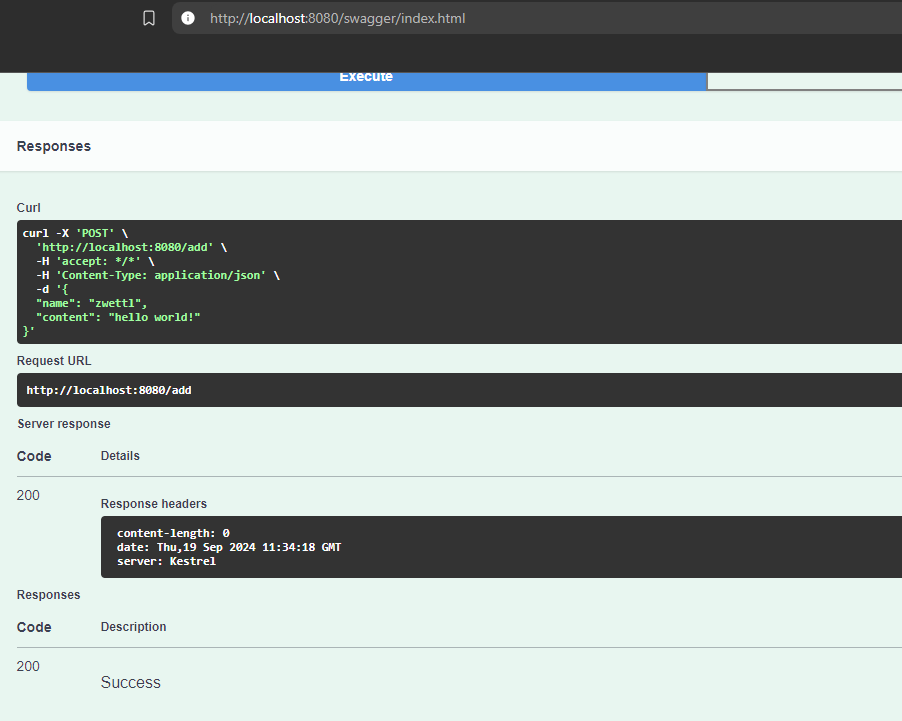
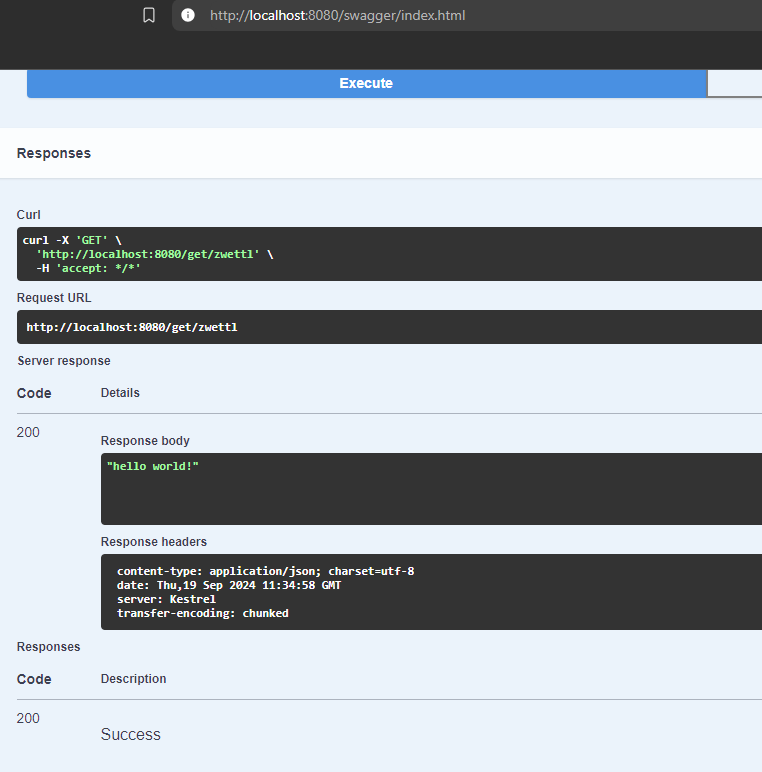
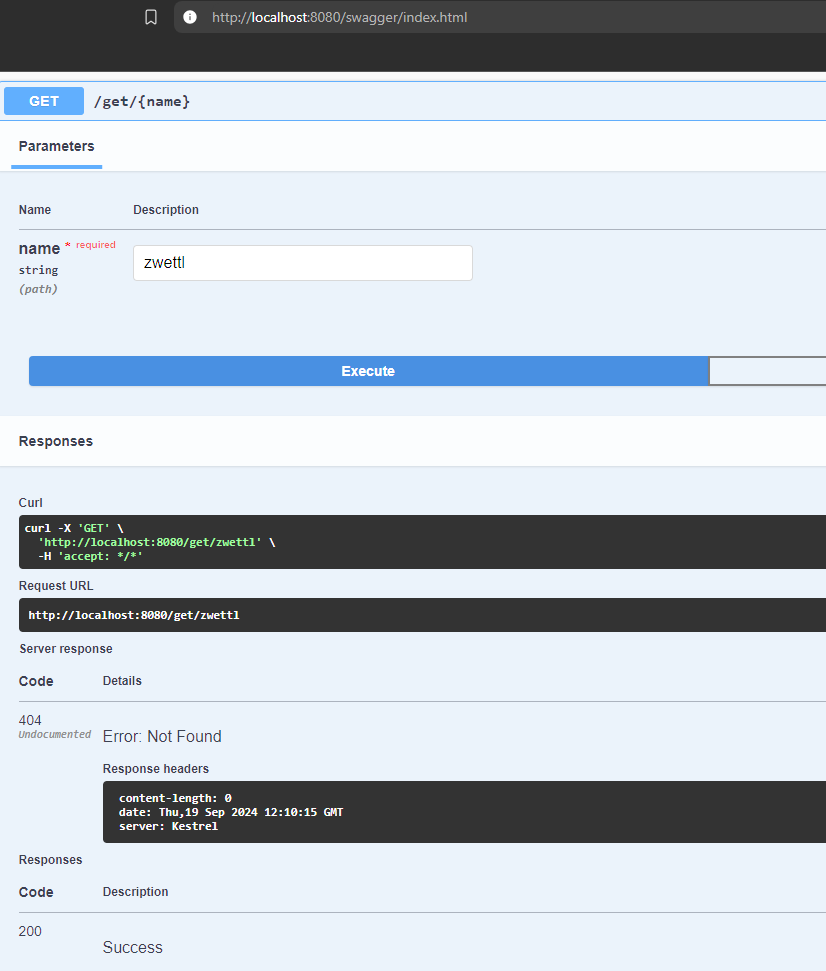
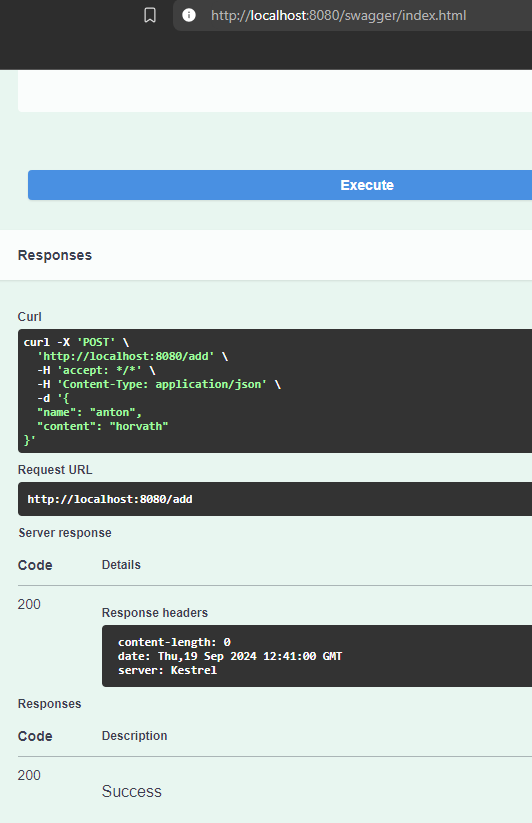
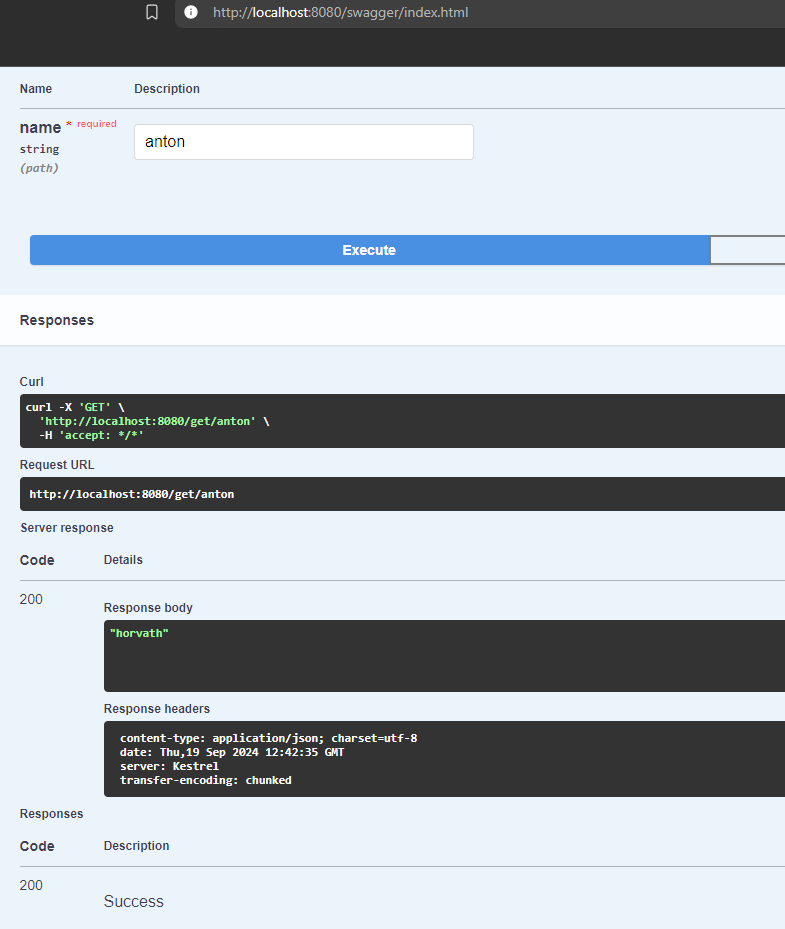
- Try using the provided API to generate and access files within the container
Now open your browser and visit your loopback-address:8080 + swagger. Here the minimal API should work properly.
Post-Endpoint:
Get-Endpoint:
- Use
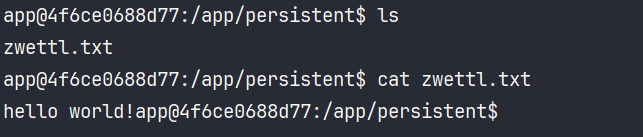
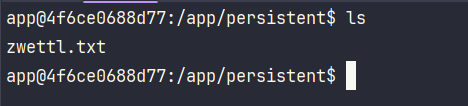
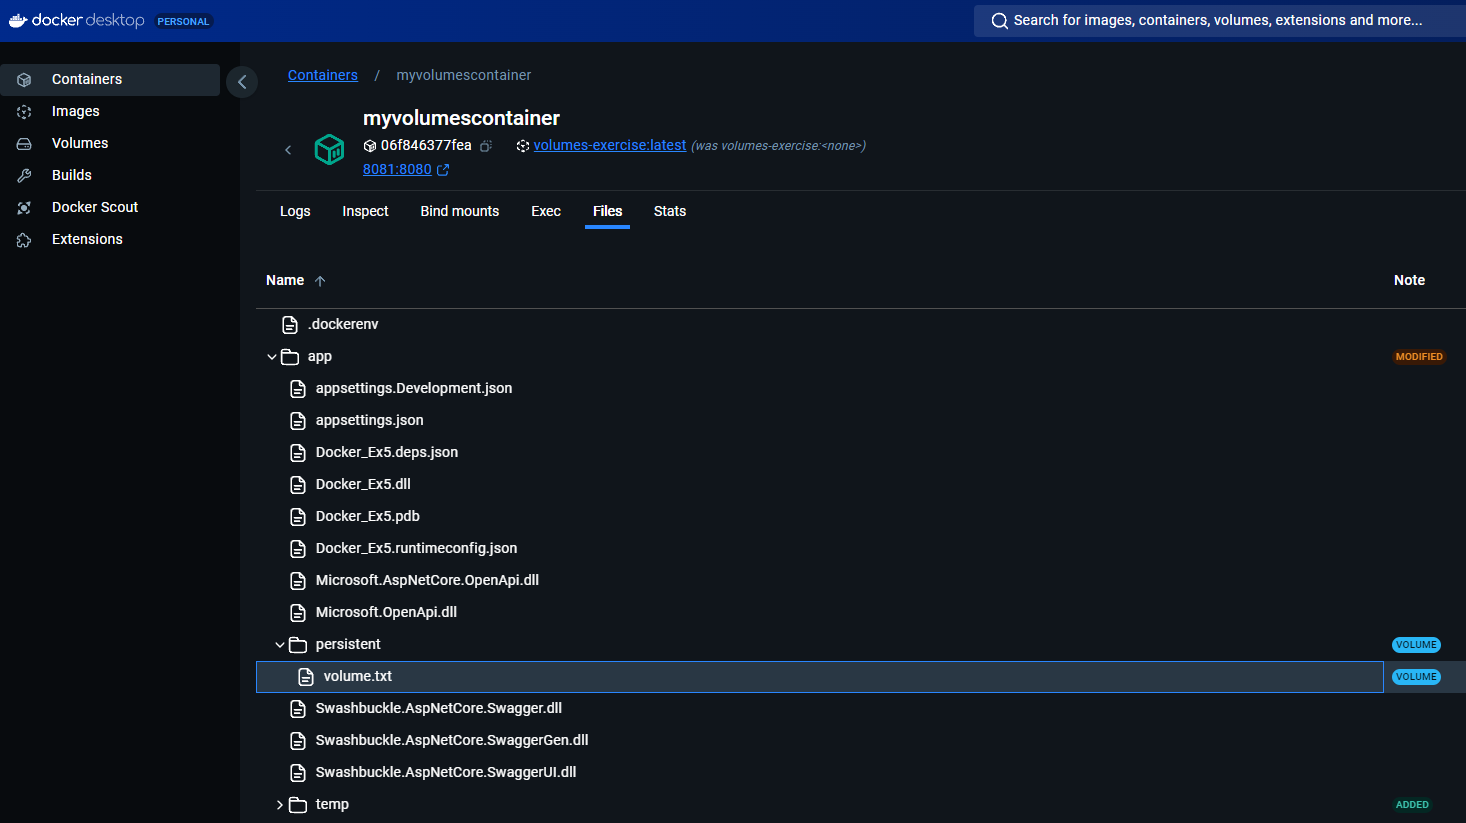
docker exec -it volumescontainer bashto connect to a bash shell inside the container. Analyse which files are generated.
Two folders are generated.
- /temp - saves files temporarely using the File.CreateText(fileNames.TempFilePath) create method
- /persistent - here the posted file is stored & generated
- ”zwettl.txt”

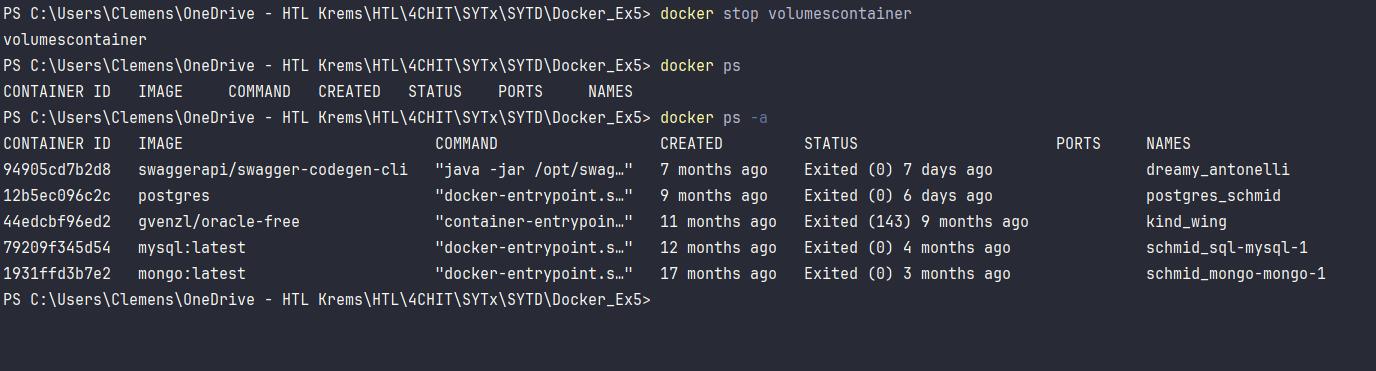
- Stop and restart the container using
docker stop volumescontaineranddocker start volumescontainer
Stopping container:

Starting container:

- Analyse if the files are still there.
The 2 folder & files are still there.
/temp:
/persistent
- Stop and remove the container.
Stopping & removing container:

- Start a new container from the image using
docker run -d -p 8080:8080 --rm --name volumescontainer volumes-exercise
Here we make sure, that our container gets removed (‘—rm’-flag) after it is stopped.

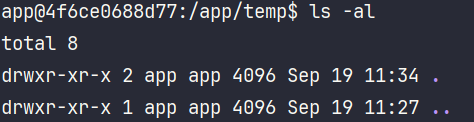
- Analyse if the files are still there.
As you can see the files are not here, since we have not defined a specific volume. Because of this, the data gets saved in the container. Above we removed our container = data is lost.

- Stop the container (this should also remove the container since you used the
--rmflag)
Exactly, our container was deleted automatically when it got stopped.
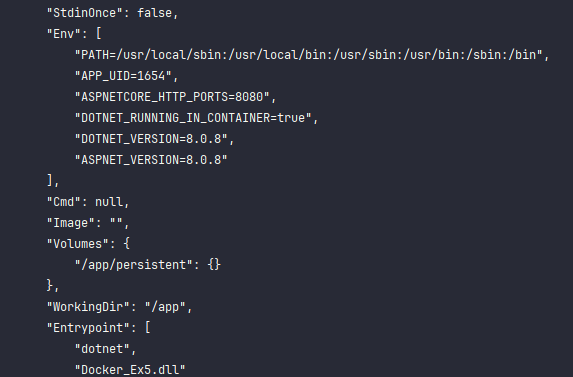
- Define a volume inside the container, adding this line to the Dockerfile:
VOLUME ["/app/persistent"]
With the specified volume, files are not saved in the container-filesystem, they are saved in a volume outside of the container.
new dockerfile:
FROM mcr.microsoft.com/dotnet/aspnet:8.0 AS base
USER $APP_UID
WORKDIR /app
EXPOSE 8080
EXPOSE 8081

FROM mcr.microsoft.com/dotnet/sdk:8.0 AS build
ARG BUILD_CONFIGURATION=Release
WORKDIR /src
COPY ["Docker_Ex5/Docker_Ex5.csproj", "Docker_Ex5/"]
RUN dotnet restore "Docker_Ex5/Docker_Ex5.csproj"
COPY . .
WORKDIR "/src/Docker_Ex5"
RUN dotnet build "Docker_Ex5.csproj" -c $BUILD_CONFIGURATION -o /app/build

FROM build AS publish
ARG BUILD_CONFIGURATION=Release
RUN dotnet publish "Docker_Ex5.csproj" -c $BUILD_CONFIGURATION -o /app/publish /p:UseAppHost=false

FROM base AS final
WORKDIR /app
COPY --from=publish /app/publish .

# added here
VOLUME ["/app/persistent"]

ENTRYPOINT ["dotnet", "Docker_Ex5.dll"]- Rebuild the image
- Inspect the image and check if the volume is defined
docker inspect volumes-exerciseHere we can see, that there is a volume ‘/app/persistent’
-
Start a new container from the image using
docker run -d -p 8080:8080 --rm --name volumescontainer volumes-exercise-
Note: In recent Images provided by Microsoft, the App runs under the user app, yet if you create a volume as described above, the created folder will be owned by the root user. Therefore, the application won’t have write access to this folder. To change the ownership of that folder add these lines to the Dockerfile:
  VOLUME ["/app/persistent"]
  RUN mkdir /app/persistent
  RUN chown app /app/persistent
-
new Dockerfile:
FROM mcr.microsoft.com/dotnet/aspnet:8.0 AS base
USER $APP_UID
WORKDIR /app
EXPOSE 8080
EXPOSE 8081

FROM mcr.microsoft.com/dotnet/sdk:8.0 AS build
ARG BUILD_CONFIGURATION=Release
WORKDIR /src
COPY ["Docker_Ex5/Docker_Ex5.csproj", "Docker_Ex5/"]
RUN dotnet restore "Docker_Ex5/Docker_Ex5.csproj"
COPY . .
WORKDIR "/src/Docker_Ex5"
RUN dotnet build "Docker_Ex5.csproj" -c $BUILD_CONFIGURATION -o /app/build

FROM build AS publish
ARG BUILD_CONFIGURATION=Release
RUN dotnet publish "Docker_Ex5.csproj" -c $BUILD_CONFIGURATION -o /app/publish /p:UseAppHost=false

FROM base AS final
WORKDIR /app
COPY --from=publish /app/publish .

# added here
VOLUME ["/app/persistent"]
RUN mkdir /app/persistent
RUN chown app /app/persistent

ENTRYPOINT ["dotnet", "Docker_Ex5.dll"]
Also make sure to rebuild the image, since the dockerfile has been changed.
docker build -t volumes-exercise -f Docker_Ex5/Dockerfile .
- Again use the API and check if the files are created accordingly.
Post:
Get:
/temp & /persistent are available.

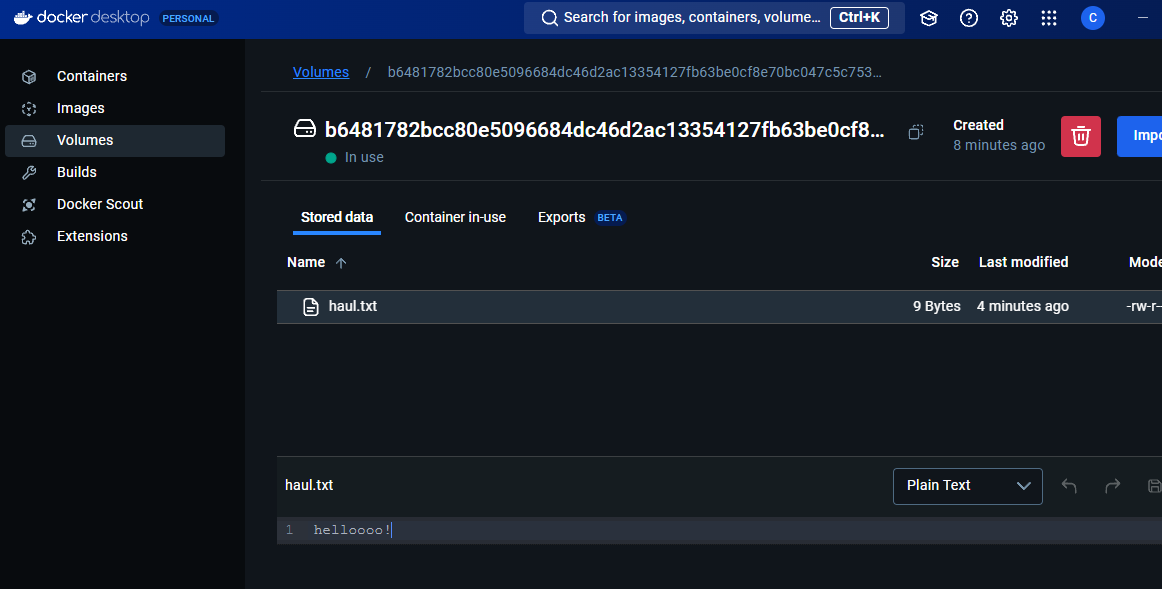
- Use Docker desktop to analyse if a volume has been created.
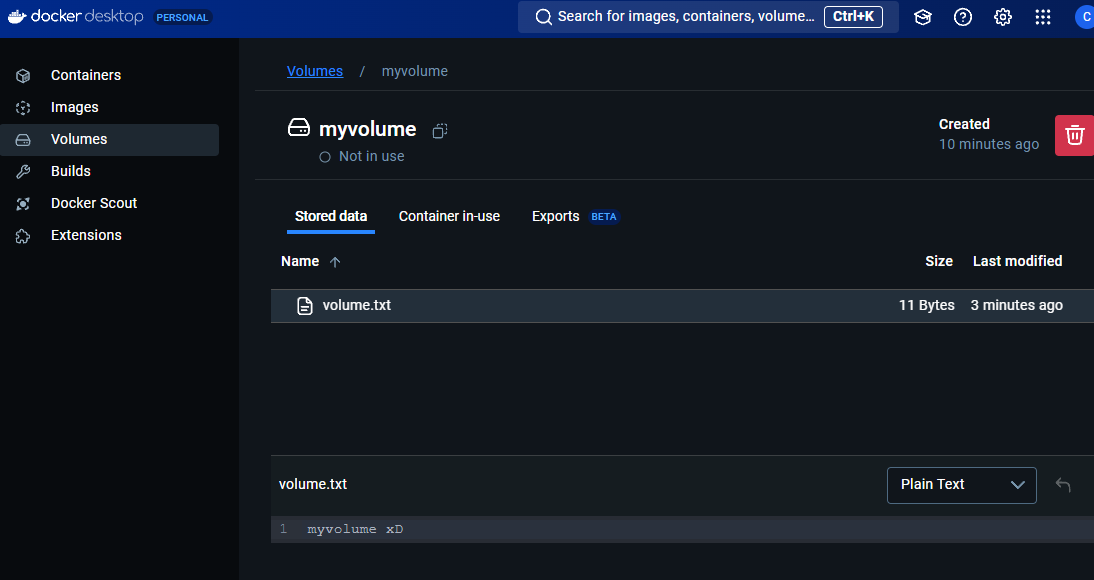
Under “Volumes” we see a new volume has been created.
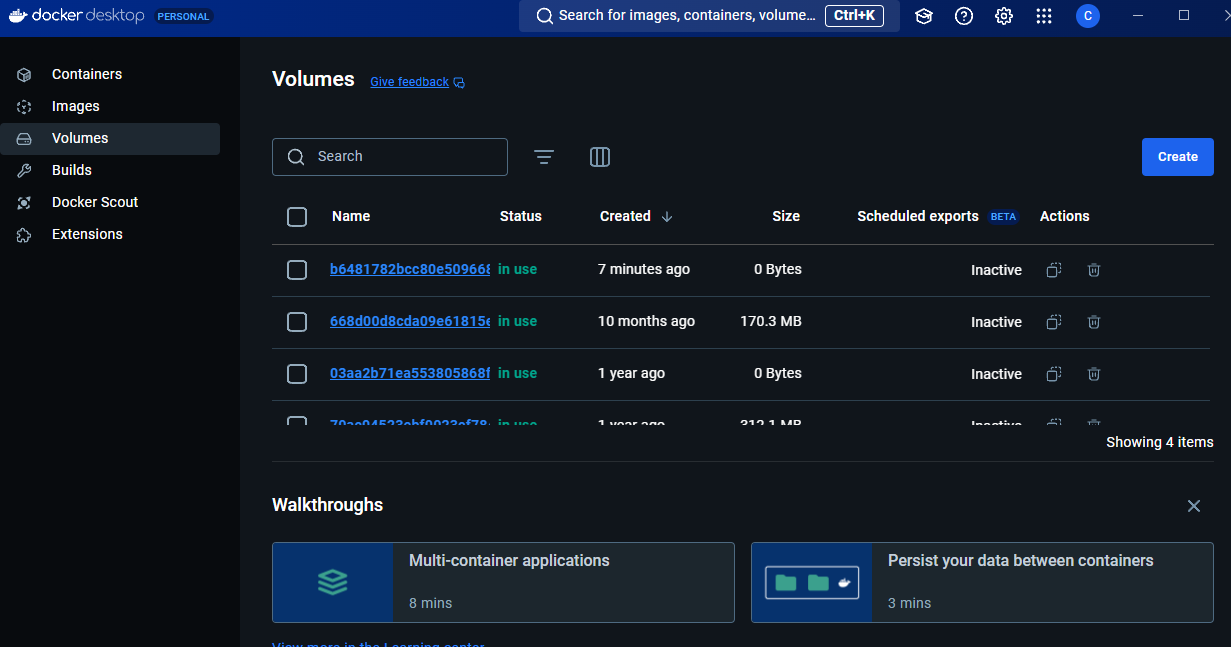
If we klick on it, we see the stored data inside the volume (Note: If we would stop the container - the container would be automatically removed & the volume too):
- Stop the container (thus removing it).
docker stop volumescontainerNow, the container was removed:

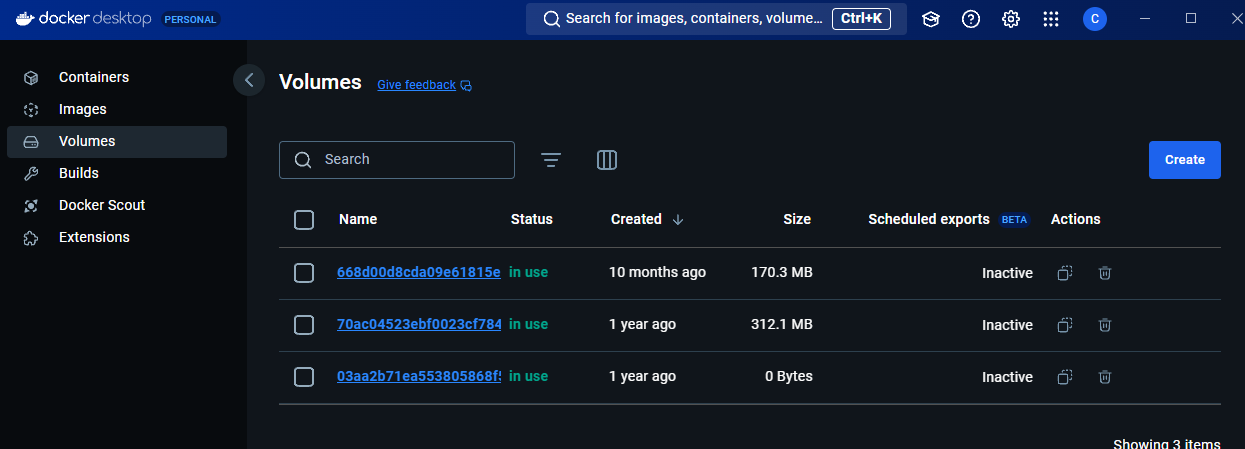
- Check if the volume is still there
As we can see, the volume gets automatically removed:
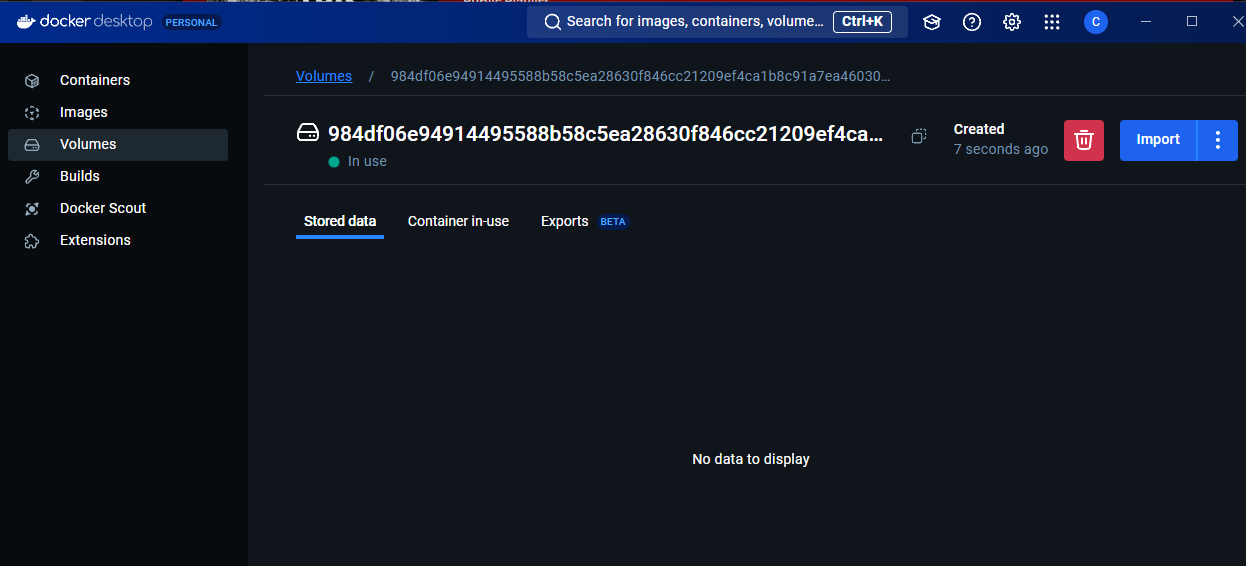
- Start a new container and analyse if the files are still there.
docker run -d -p 8080:8080 --rm --name volumescontainer volumes-containerThere is no data inside the volume.
- Stop the container (thus removing it).
docker stop volumescontainer- Start a new container from the image using
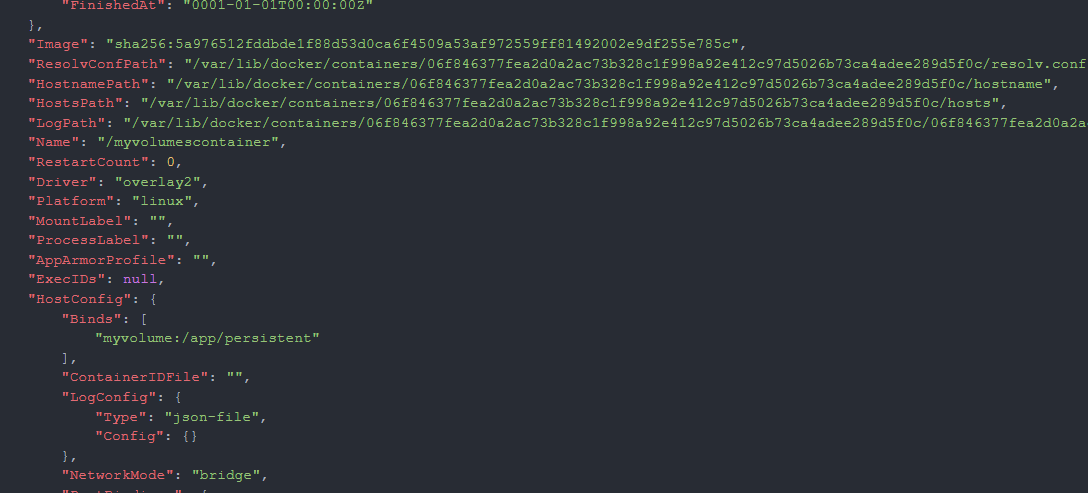
docker run -d -p 8081:8080 -v myvolume:/app/persistent --rm --name volumescontainer volumes-exercise
This runs a new container, that has a “Named Volume”. We switched from “Anonymous Volume” to a “Named Volume”.

As we can see, a new volume has been allocated in a specific path by docker:

- Generate data
Using the API in our webbrowser swagger
- POST-Request
- Stop and remove the container
docker stop volumescontainer- Check if the volume is still there
The volume is still there (Status “in use” switches to ”-”, since no container uses the volume)
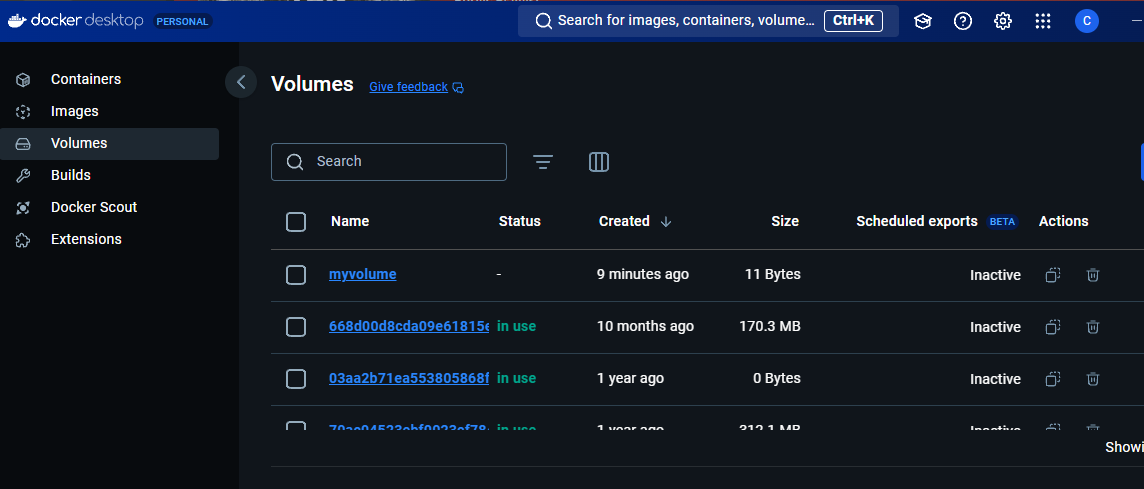
Note: The data persists.
- Start a new container from the image using
docker run -d -p 8081:8080 -v myvolume:/app/persistent --rm --name volumescontainer volumes-exercise

- Check if the files are still there.
The files are still there & since we refer to “myvolume”, the container automatically gets our previously created “volume.txt” assigned.
Volume-Info: